¶ Chia Farm Setup on Ubuntu 22.04
This document decsribes how to install chia, create compressed plots and farm with a recompute server
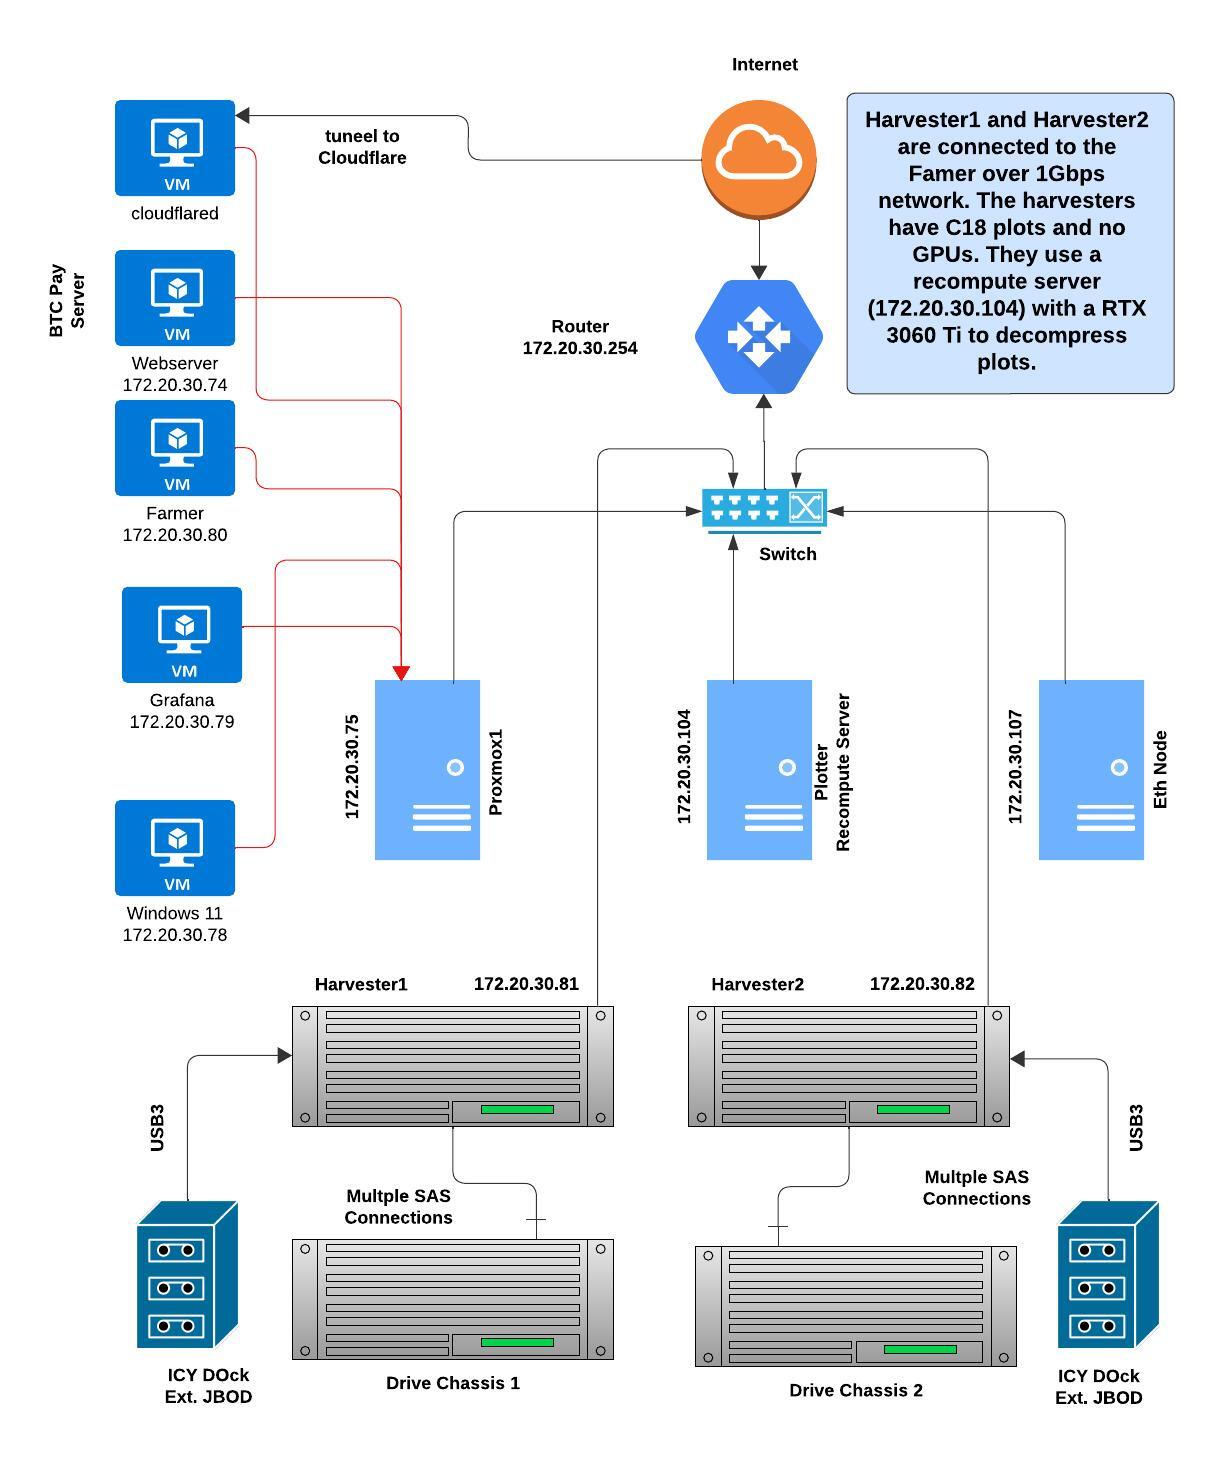
¶ Prerequisites
- Install Ubuntu Server 22.04. Reference this Guide for step-by-step instructions
- Format and mount all your drives. Reference this Guide for step-by-step instructions
- Install the NVidia drivers. Reference this Guide for step-by step instructions
¶ Download Chia
- Download Maxmax's cuda plotter from github and make it executable
   wget https://github.com/madMAx43v3r/chia-gigahorse/raw/master/cuda-plotter/linux/x86_64/cuda_plot_k32
   chmod 755 cuda_plot_k32
- Download the GigaHorse farmer from github
wget https://github.com/madMAx43v3r/chia-gigahorse/releases/download/v2.1.4.giga26/chia-gigahorse-farmer-2.1.4.giga26-x86_64.tar.gz
- Extract the archive
tar zxfvp chia-gigahorse-farmer-2.1.4.giga26-x86_64.tar.gz
- Clean up and remove the zipped archive
rm chia-gigahorse-farmer-2.1.4.giga26-x86_64.tar.gz
- Install libraries
sudo apt install libgomp1 ocl-icd-opencl-dev
¶ Inital Setup
- Change directory to the extracted Chia software
cd ~/chia-gigahorse-farmer/
- Create Initial Config
./chia.bin init
The output will look similar to the one shown below
Chia directory /home/chia/.chia/mainnet
Can't find private CA, creating a new one in /home/chia/.chia/mainnet to generate TLS certificates
No keys are present in the keychain. Generate them with 'chia keys generate'

To see your keys, run 'chia keys show --show-mnemonic-seed'
- Generate your keys
/chia.bin keys generate
The output will look similar to the one shown below
Generating private key
Enter the label you want to assign to this key (Press Enter to skip):
Added private key with public key fingerprint 979734649
Setting the xch destination for the farmer reward (1/8 plus fees, solo and pooling) to xch1k5er4gfg3nzrj0yddcut2vkwx5gzhzmx6xar7pck9cqj0cszxv4ql709wf
Setting the xch destination address for pool reward (7/8 for solo only) to xch1k5er4gfg3nzrj0yddcut2vkwx5gzhzmx6xar7pck9cqj0cszxv4ql709wf
To change the XCH destination addresses, edit the `xch_target_address` entries in /home/chia/.chia/mainnet/config/config.yaml.
- Show your public and private keys plus the mnemonic seed
./chia.bin keys show --show-mnemonic-seed
The output will look something like the one shown below
Showing all public and private keys

Fingerprint: 979734649
Master public key (m): xxxxxxxxxxxxxxxxxxxxxxxxxxxxxxxxxxx
Farmer public key (m/12381/8444/0/0): 8b3a62ff1c07225a1c7ee149d493bf436f4ea71f31eafc7f62911ff037c1ca26e08e2b1c30cf104d95aa4ec54d2772c0
Pool public key (m/12381/8444/1/0): xxxxxxxxxxxxxxxxxxxxxxxxxxxxxxxxxxx
First wallet address: xxxxxxxxxxxxxxxxxxxxxxxxxxxxxxxxxxx
Master private key (m): xxxxxxxxxxxxxxxxxxxxxxxxxxxxxxxxxxx
Farmer private key (m/12381/8444/0/0): xxxxxxxxxxxxxxxxxxxxxxxxxxxxxxxxxxx
First wallet secret key (m/12381/8444/2/0): xxxxxxxxxxxxxxxxxxxxxxxxxxxxxxxxxxx
  Mnemonic seed (24 secret words):
blah blah blah blah blah blah blah blah blah blah blah blah blah blah blah blah blah blah blah blah blah blah blah blah
Write down your 24 word mnemonic seed. Save it in a safe location. You are screwed without it! Also take note of your Farmer public key. You will need that when you start plotting.
- Start the everything
./chia.bin start farmer
The output will look something like the one shown below
Daemon not started yet
Starting daemon
chia_harvester: started
chia_farmer: started
chia_full_node: started
chia_wallet: started
You will have to wait until the wallet and blockchain are synced before you create your first NFT
- Check to see if your wallet is synced (Usually happens pretty fast 5-10 minutes).
./chia.bin wallet show
Once the wallet is synced, the output will look something like the one shown below
Wallet height: 4990547
Sync status: Synced
Balances, fingerprint: 979734649

Chia Wallet:
   -Total Balance:         0.0 xch (0 mojo)
   -Pending Total Balance: 0.0 xch (0 mojo)
   -Spendable:             0.0 xch (0 mojo)
   -Type:                  STANDARD_WALLET
   -Wallet ID:             1
- Generate a wallet address and get some free chia the Chia Faucet so you have a minimal balance in your wallet to generate the NFT.
./chia.bin wallet get_address
xch1024zemmc8z3clmlsxrpjyqhkd3ldkxmjuxpsx9zr6p6jj35whvws4qau7q
- Generate your NFT (Using the figerprint from Step 4)
./chia.bin plotnft create -f 979734649 -s local
- On the command line type this to see your NFT details:
./chia.bin plotnft show
Once everything is synced and the NFT created you will see an output similar to the one shown below:
Wallet ID: 8
Current state: SELF_POOLING
Current state from block height: 4996527
Pool contract address (use ONLY for plotting - do not send money to this address): xch1fp0uj58pa9la9mmu6xq86clfege4tks035mn2mvljqmh02lhd64q6lxpp3
Claimable balance: 0.0 xch (0 mojo)
Pay attention to the Pool contract address take note of it
¶ GPU Plotting
Please format and mount your drives first before you start plotting. Refer to Step 2 in this document on how to do this. In this howto we have formatted a mounted our TEMP NVME drive on /nvme and our storage drives on /local/disk-01 and /local/disk-02
These are the things you are going to need before you start
- Chia Items
- Farmer public key: 8b3a62ff1c07225a1c7ee149d493bf436f4ea71f31eafc7f62911ff037c1ca26e08e2b1c30cf104d95aa4ec54d2772c0
- Pool contract address: xch1fp0uj58pa9la9mmu6xq86clfege4tks035mn2mvljqmh02lhd64q6lxpp3
- Cuda Plotter from Step 1 on this document
- Hardware
- A Machine with 256GB of RAM
- a fast NVME drive as a temporary drive to store all the plots before you move them onto slow mechanical drives
- a script to move the plots as they are created
- A decent GPU (something like a 3060 or a 3060 Ti)
The syntax for plotting is fairly self-explanatory.
./cuda_plot_k32 -n 10 -C 18 -t /nvme/ -d /nvme/ -c xch1fp0uj58pa9la9mmu6xq86clfege4tks035mn2mvljqmh02lhd64q6lxpp3 -f 8b3a62ff1c07225a1c7ee149d493bf436f4ea71f31eafc7f62911ff037c1ca26e08e2b1c30cf104d95aa4ec54d2772c0
- Explanation
- n 10 means make 10 plots
- C 18 mean use compression level 18
- t and d specify the temp and final drives
- c specifies the pool contract address
- f specifies the farmer public key
On a 3060 or 3060 Ti the plots will take a little less than 3 minutes each and about 30-40 seconds on top of that to be written to a fast NVME drive.
The output of the plotting process should look something like what is shown below:
Crafting plot 1 out of 10 (2024/02/26 06:20:55)
Process ID: 590765
Pool Puzzle Hash:  xxxxxxxxxxxxxxxxxxxxxxxxxxxxxxxxx
Farmer Public Key: xxxxxxxxxxxxxxxxxxxxxxxxxxxxxxxxx
Working Directory:   /nvme/
Working Directory 2: @RAM
Compression Level: C18
Plot Name: plot-k32-c18-2024-02-26-06-18-5deasdfasdfasdftrnytu78ikdft456f356g7v6888893456758h868b5481a8a
[P1] Setup took 3.057 sec
[P1] Table 1 took 4.469 sec, 4294967296 entries, 16788017 max, 66554 tmp, 0 GB/s up, 7.38426 GB/s down
[P1] Table 2 took 7.361 sec, 4294863361 entries, 16787756 max, 66758 tmp, 4.34724 GB/s up, 7.28505 GB/s down
[P1] Table 3 took 12.121 sec, 4294694075 entries, 16787393 max, 66602 tmp, 4.28997 GB/s up, 7.48703 GB/s down
[P1] Table 4 took 15.667 sec, 4294357904 entries, 16785612 max, 66643 tmp, 5.61654 GB/s up, 7.3722 GB/s down
[P1] Table 5 took 15.736 sec, 4293764994 entries, 16787903 max, 66619 tmp, 7.11643 GB/s up, 7.33987 GB/s down
[P1] Table 6 took 13.831 sec, 4292499227 entries, 16777167 max, 66621 tmp, 5.78249 GB/s up, 7.15785 GB/s down
[P1] Table 7 took 9.029 sec, 4289904594 entries, 16767412 max, 66497 tmp, 7.0842 GB/s up, 5.0255 GB/s down
Phase 1 took 81.791 sec
[P2] Setup took 0.386 sec
[P2] Table 7 took 4.243 sec, 7.53294 GB/s up, 0.11969 GB/s down
[P2] Table 6 took 4.244 sec, 7.53572 GB/s up, 0.119661 GB/s down
Phase 2 took 9.09 sec
[P3] Setup took 3.506 sec
[P3] Table 5 LPSK took 6.399 sec, 3531400537 entries, 13874564 max, 54997 tmp, 5.07874 GB/s up, 7.09099 GB/s down
[P3] Table 5 NSK took 8.691 sec, 3531400537 entries, 13811058 max, 54997 tmp, 4.16265 GB/s up, 6.78138 GB/s down
[P3] Table 6 PDSK took 6.599 sec, 3710857580 entries, 14519575 max, 57613 tmp, 4.92339 GB/s up, 6.87608 GB/s down
[P3] Table 6 LPSK took 8.881 sec, 3710857580 entries, 15086327 max, 60454 tmp, 7.24322 GB/s up, 5.57372 GB/s down
[P3] Table 6 NSK took 7.859 sec, 3710857580 entries, 14506939 max, 59943 tmp, 5.27702 GB/s up, 7.4993 GB/s down
[P3] Table 7 PDSK took 7.286 sec, 4289904594 entries, 16783251 max, 66497 tmp, 6.03186 GB/s up, 6.22773 GB/s down
[P3] Table 7 LPSK took 9.982 sec, 4289904594 entries, 17198252 max, 68843 tmp, 7.17253 GB/s up, 5.41915 GB/s down
[P3] Table 7 NSK took 9.513 sec, 4289904594 entries, 16767412 max, 68221 tmp, 5.03978 GB/s up, 6.51734 GB/s down
Phase 3 took 69.032 sec
[P4] Setup took 0.919 sec
[P4] total_p7_parks = 2094680
[P4] total_c3_parks = 428990, 2384 / 2453 ANS bytes
Phase 4 took 5.618 sec, 5.68926 GB/s up, 3.11134 GB/s down
Total plot creation time was 165.72 sec (2.762 min)
Flushing to disk took 36.231 sec
¶ Recompute Server
Since the harvesters do not have GPUs we will use a recompute server to do the C18 plot decompression. In our case the recompute server is a physical machine with an RTX 3060 Ti
Prerequisites
- Install Ubuntu Server 22.04. Reference this Guide for step-by-step instructions
- Install the NVidia drivers. Reference this Guide for step-by step instructions
Software Setup and Operation
- Download the GigaHorse farmer from github
wget https://github.com/madMAx43v3r/chia-gigahorse/releases/download/v2.1.4.giga26/chia-gigahorse-farmer-2.1.4.giga26-x86_64.tar.gz
- Extract the archive
tar zxfvp chia-gigahorse-farmer-2.1.4.giga26-x86_64.tar.gz
- Clean up and remove the zipped archive
rm chia-gigahorse-farmer-2.1.4.giga26-x86_64.tar.gz
- Install libraries
sudo apt install libgomp1 ocl-icd-opencl-dev
- Start a new screen session
screen -S recompute
- Start the recompute server
   cd ~/chia-gigahorse-farmer/
   ./chia_recompute_server
- Detach from the screen session and logout
To detach the session press CTRL-A and the D. Once you are back to the command prompt type exit to log off.
¶ Harvester Setup
The farmer certificates need to be copied to the harvester. The certificates are located in the ~/.chia/mainnet/config/ssl/ca directory. Copy the folder via sftp or scp from the farmer to the harvester before moving forward.
Prerequisites
Install Ubuntu Server 22.04. Reference this Guide for step-by-step instructions
- Download the GigaHorse farmer from github
wget https://github.com/madMAx43v3r/chia-gigahorse/releases/download/v2.1.4.giga26/chia-gigahorse-farmer-2.1.4.giga26-x86_64.tar.gz
- Extract the archive
tar zxfvp chia-gigahorse-farmer-2.1.4.giga26-x86_64.tar.gz
- Clean up and remove the zipped archive
rm chia-gigahorse-farmer-2.1.4.giga26-x86_64.tar.gz
- Install libraries
sudo apt install libgomp1 ocl-icd-opencl-dev
- Change directory to the Gigahorse software
cd chia-gigahorse-farmer/
- Import the farmer certificates
./chia.bin init -c ../ca
- Tell this harvester what the farmer's IP adress is
./chia.bin configure --set-farmer-peer 172.20.30.80:8447
- Disable UPNP
./chia.bin configure -upnp false
- Add plots (Let's assume your plots are located in /hvst1/disk-01)
./chia.bin plots add -d /hvst1/disk-01
- Tell tehe harvester what the recompute server's IP address is
export CHIAPOS_RECOMPUTE_HOST=172.20.30.104
- Start the harvester
./chia.bin start harvester
¶ Operations
Here is a list of common commands that will let you do basic day-to-day opeartions on your chia farm.
- Start farmer
./chia.bin start farmer
- Start harveser
./chia.bin start harvester
- Stop everything
./chia.bin stop all -d
- Add Plots
./chia.bin plots add -d /usb/disk-01
- Remove Plots
./chia.bin plots remove -d /usb/disk-01
- Show sync status of the blockchain
./chia.bin show -s
- Show farm/harvester status
./chia.bin farm summary
This will show you farm status, connected harvester(s), plot count(s), block rewards and last height farmed.
- Show NFT Plot information
./chia.bin plotnft show
- Show wallet balanced
./chia.bin wallet show
- Show wallet transactions
./chia.bin wallet get_transactions
¶ Logging
Make sure to enable INFO level logs by editing ~/.chia/mainnet/config/config.yaml and setting the log_level: INFO
One of the most important things to look for in the logs is the harvester latency. Ideally it should be sub 5 seconds.
- Look at the log in real time:
tail -f ~/.chia/mainnet/log/debug.log
There will be a mountain of information coming your way. You are looking for the harvester latency being sub 5 seonds. Those lines should look like this:
2024-07-30T16:31:45.738 harvester chia.harvester.harvester: INFO     43 plots were eligible for farming cb1234... Found 0 proofs. Time: 3.63326 s. Total 9885 plots
2024-07-30T16:31:53.951 harvester chia.harvester.harvester: INFO     32 plots were eligible for farming cb1234... Found 0 proofs. Time: 3.01967 s. Total 9885 plots
2024-07-30T16:32:05.486 harvester chia.harvester.harvester: INFO     43 plots were eligible for farming cb1234... Found 0 proofs. Time: 4.36146 s. Total 9885 plots